Thursday 17 May 2012

$5 max - Make a light studio for taking professional photos of your products

How DO crafters get such great photos of their stuff that look like they've been in the photographers studio all day? Go from amateur to professional photos in under an hour for LESS THAN $5.  Promise.


Here's what you'll need:

  • Empty cardboard box*
  • Stanley Knife or similar cutting device
  • White tissue paper ($2 approx)
  • Large piece of Postercard ($3 approx)
  • Sticky tape

Seriously, this is all you need.

How to build it? Read on...

*The Cardboard Box is the most important element in building this studio.  If it's too big, the spot  lights shining into it will have a tough job providing enough lighting your item (that's what happens to me).  If it's too small, you run the risk of not being able to avoid hitting the sides with the item or being able to avoid the sides by cropping them out.  My rule of thumb is 'bigger than a nappy box, but smaller than a moving box, and try to get one that is square or a deep rectangle to ensure your items fit inside with enough surrounding space. Don't have a box around the house?  Pop down to the local hardware store/supermarket and grab a free one, or if you know someone that's just moved a small moving box is ideal.


Now that you've got your box, it's time to cut it to size.  You want to cut into four of the six sides, leaving two untouched.  Three will have windows and the fourth will have an entire side cut out. 
Cut close to the edge, but leave a good inch or so to keep a bit of strength in the sides, as the thinner the sides, the more flimsy it will be.  Cut the entire wall out of one side which will be the front of the light studio.  I left a front flap on mine but there's really no need to do that. In fact if you leave the two opposing flaps on and turn it on its side, they will act to control the amount of light coming in.  I didn't do this, simply because I forgot and had cut the flaps off before I remembered I was going to leave them on, nevermind, no biggie.

Grab your white tissue paper and cover the three sides with windows leaving the entire wall you've cut out uncovered (this is where the items are inserted in and out, so you need that whole wall free.)
With the walls removed, it makes the box quite flimsy (see my photo) so try to be pretty gentle sticking the tissue paper on. It doesn't have to look overly professional, try to get the tissue paper neat and tidy, but as long as the spotlight(s) can still shine through the tissue paper, it'll be fine.


I accidentally stuck my finger through the tissue paper (if you're particularly clumsy use tracing paper as it's tougher), but it's simple enough to stick up the hole and carry on, no harm done.

Once you've covered the three windows up with tissue paper, you need to stick the backing paper up to create an "infinity sweep" (endless background).  A large sheet of white poster card is ideal and you can pick them up from your local Officeworks, or craft store. Sometimes cheap shops sell large sheets of cards too (along with tissue paper).  The one thing you DON'T want to do is stick two sheets together.  The background needs to be seamless.  You can never hide the seam in photos (without photoshop that is, but why bother going to that trouble every time you take a photo) and it will ruin the look.  If you're using the card underneath just to hold up another sheet of fabric/card then it's ok to have a seam as the card will not be seen. 


The beauty of this light studio is that you can change backgrounds simply by switching the card to another colour or by draping fabric. If you want to be tricky, try sticking a couple of crocodile clips up in the top corners inside the box which can hold up a sheet of fabric if you want to experiment with different backgrounds.  This is especially good if you're photographing white or off-white items which will otherwise look washed out.

Setting up your spotlights is the final thing to do before taking your photographs.  You'll need to play around with this to work out the best set up for you, but as a starting point try this: set the box on a table next to a window with indirect light (natural light) coming in.  Then situate the box so you have a light from the ceiling shine in through the top window (if you don't have a spotlight directed through the top as I don't), and a spotlight shining through the other side. The lights I've used below are not ideal, but they are ok for my purposes and I didn't have to go and buy some specially for it (they're from the spare room!).  A white light spotlight would be better, these globes are too warm but nevermind.


And there you have it! Start taking photos straight away.  You'll be blown away at the difference this little cheap technique makes to your photos. 


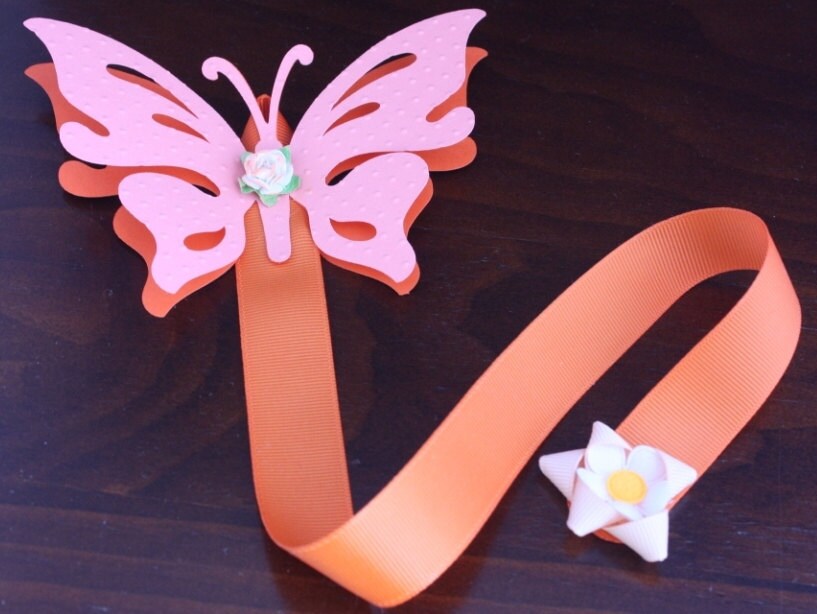
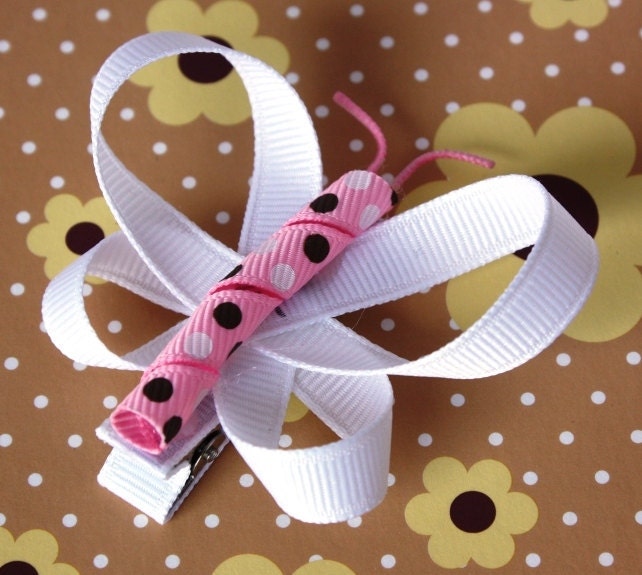
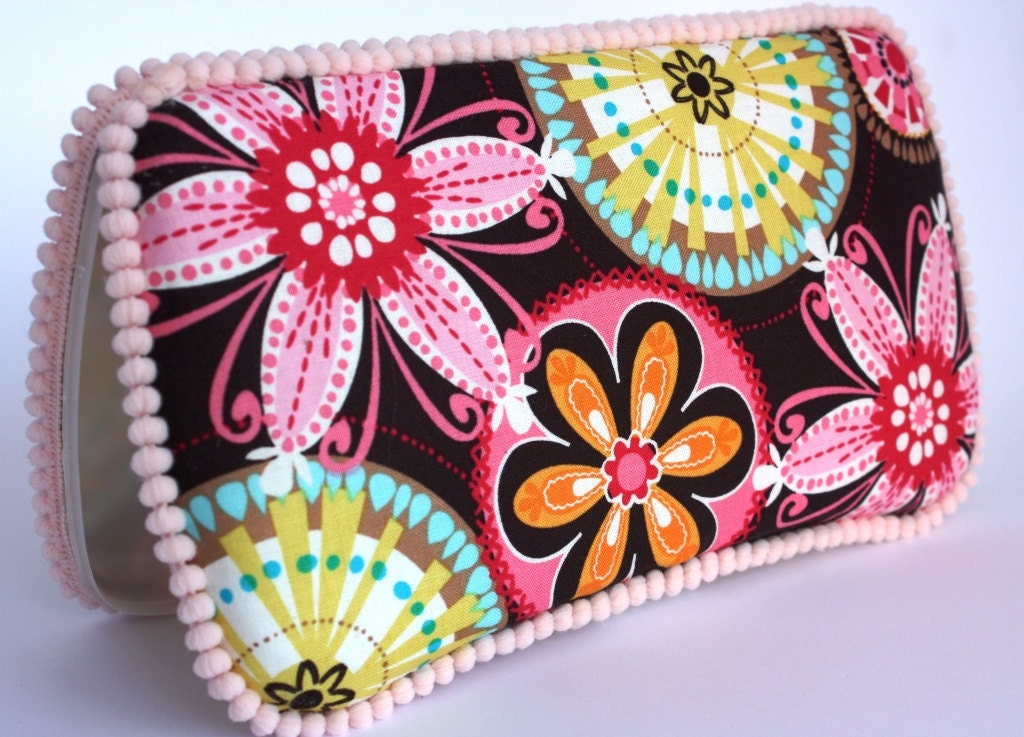
When selling items it's best to have a range of photos of the product from different angles.  Experiment with positioning yourself and the item, add a different background, put another everyday in the picture to add size perspective such coins or bank notes, or lie a ruler in there alongside the item to indicate the size of the item. Use your imagination!

Find yourself some photo editing software and crop the sides, then play with the colours, contrast and brightness to get it just right.  Looks pretty professional huh! (normally I would crop this even closer, but for the purposes of this tutorial, you get the idea).  You can even buy this cube in my Etsy shop...


Tuesday 20 March 2012

Nappy change kit

I can't believe it's taken so long to get my next post up. I've got a few things up my sleeve to add here, but for today, I thought I'd write about my latest product that I'll be selling - the NAPPY CHANGE KIT which includes a wipes case, change mat and drawstring bag. 


I got new labels made from mommiemadeit, all the way from Texas and they look great! 


The change mat measures 20" x 16" and is the perfect size to fold up into the drawstring bag and pull out when you need it.  Ripstop fabric is great for wet spills and it wipes clean so easily, just use a wipe from the case and it's good to go again next time.  You can machine wash if you need, but only necessary for those really big spills. 

  This is Edie testing out the new mat and is showing definite interest in the wipes case. Using the change mat as a bottom protector on the grass is also a bonus, or you can use it to line the baby seat on the shopping trolleys at Woolies too. 
The change mat is made with cotton fabric on one side and ripstop fabric on the other, with a layer of wadding for extra comfort in the middle.  Edie finds it quite comfy!

Want to buy one? I've got them for sale on Etsy for $35. Great baby shower gift! 

Monday 19 December 2011

Pram liner tutorial

Edie's new pram liner
TOTAL COST: around $20
TOTAL TIME: around 2-3 hours

A couple of weeks ago I got my sewing machine serviced.  It had been playing up for a while catching underneath and even though I only use it for straight and zigzag stitching, getting it fixed has changed everything! 

This is my very first tutorial.  I'm a visual learner, so I've tried to add as many pictures as I could.   

Before making this liner, I looked around the internet and found a few blogs with pram liner tutorials and for sale, and got some great inspiration from  Floating World  and also Sew Pony.  Thanks ladies for your great tutorials!

Pram Liner Tutorial Instructions.

I took ages to decide what fabric I wanted and what colours.  I decided on a reversible liner, with a lovely red flowers on one side, and a red nylon ripstop fabric on the reverse for durability and to add a bit of water resistance in case of spills (if you know what I mean).  In the middle is quite a thick piece of wadding for added cushy-ness.

So here's what you'll need to make one like mine:
  • 1 piece of 40cm x 80cm piece of top fabric (I used the red flower 100% cotton fabric)
  • 1 piece of 40cm x 80cm piece of bottom fabric (I used red nylon rip stop, but you can use a different colourful cotton, or something that will not be seen such as a simple calico or plain drill fabric)
  • 1 piece of 37cm x 77cm piece of wadding (or 'batting' if you're American)
  • 2m of bias binding tape (I bought a packet of 25mm x 3m and there's just over a metre left over)
If you're buying everything from scratch, get half a metre of each of the two fabrics, and also the wadding.  In case you're wondering how much it would cost to make one yourself, here's an idea of how much mine cost:
Flowers cotton fabric: $10 ($20 per metre, you can get cotton fabrics much cheaper than this, but I HAD to have this one)
Nylon ripstop fabric: $4 ($8 per metre)
Wadding: $3 ($6 per metre)
Bias binding: $4 (pre-packed 3m length)
I'm going to assume you've already got matching thread, but if not add a couple of bucks for the thread. 
TOTAL COST: $21

These are the things you'll need before you start


1. CUT OUT
Cut the one piece of each of the two fabrics you've selected and also one piece of the wadding so you have three pieces in total. 

Notice that the wadding is 3cm smaller than the other two fabrics 


This picture is a little warped because of the
camera angle, the lines meant to be straight!
2. MEASURE
Measure your pram and work out where the strap holes above the shoulders and also the one between the legs are.  I actually drew my pram liner (not to scale) on a piece of paper and wrote the measurements on that to work out where the holes where to go.


3. MARK THE SEWING LINES
Using tailors chalk (or pen if you're like me) draw a line through the middle from the top to the bottom on the top piece of fabric.  Also measure the crease line (where the back rest folds to make the seat of the pram). Then measure where the straps are located and draw them on your fabric as this is where the button holes will be sewn to push the straps through.


4. TIME TO SEW
The reverse side (finished) to indicate
sewing lines and buttonhold placement
Place your bottom piece down first, wrong side up, then your wadding, then place your top fabric right side up to make a wadding sandwich.  Pin the edges ensuring the wadding is centred as you don't want to sew the wadding into the seams. Using matching thread, sew right down the middle of the top fabric.  Then sew the crease line from side to side. 

5. SEW ADDITIONAL LINES
To add a quilted look to the liner (which also works to hold the fabric together better), add two more lines to the back rest section and one more to the bottom section.  Trim all the threads back, no need to tie off as they'll be secured when the bias binding goes on last.  Try hard to keep the lines parralel, mine are a bit crooked as I didn't draw them on thinking I could wing it (oops), they're not that noticeable I guess, but I know they're crooked and every time I look at it, I see it. 

Notice the buttonholes intersect the sewn lines
6. SEW BUTTONHOLES
Now that you've got your three layers all carefully stitched together, you'll have raw edges but neatly sewn lines on the fabric.  Time to sew the buttonholes.  If your pram is like mine, you'll have the two top straps intersect with both the horizontal and vertical lines and you'll sew a buttonhole through them.  My top buttonholes were approximately 5 cm along, but my seat buttonhole needed to be much bigger (8cm) in order to push the buckle through, even though the webbing was only 5cm. Using a seam ripper/quick unpick, rip open the seams and tidy up the loose threads with embroidery scissors.

7. ATTACHING THE BINDING
Open up the binding and pin the right side of the opened out binding loosely around the top fabric. Slide the binding down a bit to expose about 2mm of the fabric underneath, this will ensure you catch both fabrics when you sew, but not the wadding or it will too difficult to sew through.  TIP: fold the edge over about 5mm before you start sewing so you have a neat edge. 
Notice the start edge is folded over and also that the binding is slightly in from the edge.


When you get back to the start, leave the needle in place but lift the footer up.  Cut the binding approximately 5mm longer so it overlaps the bit you've folded over.  You can leave the edge raw because it will be covered up with the binding.

8. TOP STITCHING THE BINDING
Now that you've sewn on the binding, it's time to fold it over to see the finished product, then top stitch it.  This is a really important step as you must catch both sides of the binding and keep the stitching straight and the same distance from the edges, a feat trickier than some people would have you believe.  Store bought bias binding is already pressed with folds in the right spots for you, so that really helps, and I find it easier to pin where I'll be stitching, then turn over to see that your pins match up properly.  Sew all the way round and tie off the threads.  Press the whole thing and you're done!  Attach to your pram and stand back to admire.

The finished product!  I love it!

If you can't be bothered making one of these yourself, I found some fantastic premade ones on Etsy

If you want to see what I make on Etsy, click here.

Thursday 1 December 2011

Edie & Me - the beginning

Welcome to my first blog, the beginning of my latest craze - CRAFT!
It all started a few months before I had my daughter, Edie. I needed something to do with hands, to sit with better posture instead of slouching in front of the tv, and to keep my mind from being bored waiting and getting bigger with my pregnancy.  My mother in law just happened to bring some craft stuff with her during a visit and I offered to help.  And one thing led to another!  Soon I was buying ribbons, hairclips, flowers and fabrics from around the world and setting myself up as a crafter.  And I am now hooked.

I first discovered a love of making ribbon hairclips for little girls. I then went on to felt flowers and then discovered that was quite adept at making fabric-covered wipes cases.  These are now my favourite thing to do and I love searching shops and the internet for new fabrics and trims.   The latest item I've added to my collection is hairclip holders with cardstock butterflies.  So cute!  And a fantastic Christmas gift too...

CRAFT FAIR
Together with my mother-in-law I took part in my first ever craft fair in November 2011.  I exceeded expectations with sales of wipes cases way more than I ever anticipated.  My hairclips were popular too, but the wipes cases were a unique gift idea that many fair visitors had never seen before, so that helped.  I'll be back again in 2012 too.
  
WHERE TO BUY MY STUFF
A few months ago I set up my Etsy store (www.edieandme.etsy.com) and I've started to slowly sell a few things there too.   So much competition on this site, but it's made me realise what people want to buy, how high quality the items that people make are, and what standard I need to be at if I want to keep this up.  Whew!  It's a tough world out there.

WHY AM I WRITING THIS?
With this blog I thought I could update people on what I'm making, what I'm up to and how to do a few things .  I have learnt a lot from tutorials by others which have really helped me, so I figure I ought to give back to the craft community too.  I just need to take the time to write out the details and photograph the steps.  Coming soon....

WHAT DO I MAKE?
Here's a sample of what I currently make and sell on Etsy.  Click on the picture to be taken to the item on Etsy.

Butterfly hairclip holder


Butterfly hairclips


 Fabric covered Baby wipes cases


I hope you like what you see so far, keep reading as I start to post more stuff on here.